Ginger Five Spice Marinade

June 8, 2009

Chinese Five Spice is a really handy item to keep in your pantry because its warm, sweet and spicy flavor enhances both savory and dessert dishes. Five Spice’s composition of cassia cinnamon, star anise, fennel, cloves and ginger (or sometimes Szechuan peppercorns in place of ginger) is based on the traditional Chinese philosophy of balancing yin and yang in food because those spices represent the full spectrum of flavor- sweet, sour, salty, bitter, spicy. Personally, I don’t pick up on the salty, sour or bitter flavors that are supposedly present in Five Spice but who am I to argue with ancient Chinese philosophy? All I know is that it tastes fantastic, especially when mixed with a little citrus and fresh ginger to brighten the flavor.

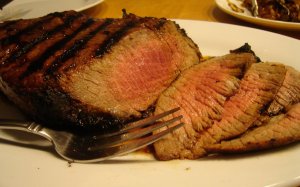
I often pair this marinade with flank steak or london broil but it also works well with chicken and pork. For best results, marinate about two pounds of meat (that’s usually enough for four people with some left over) for at least 24 hours to really allow the flavors to penetrate. Or, instead of a marinade, use this recipe as a glaze and brush onto pan-seared or grilled salmon or tuna toward the end of the cooking time.

GINGER FIVE SPICE MARINADE

Whisk together:

1/4 cup soy sauce
1/4 cup orange marmalade
2 teaspoons rice wine vinegar
2 tablespoons vegetable oil or sesame oil
1 tablespoon grated ginger
1 teaspoon crushed garlic
2 teaspoons Chinese Five Spice

If you’re using the recipe as a glaze, use only 1 teaspoon of oil and cut the remaining ingredients in half because you won’t need as much.

No Cook Appetizers – Spicy Marinated Olives & Prosciutto Wrapped Hearts of Palm

May 30, 2009


I’m crazy for appetizers. Whetting your appetite in anticipation of the upcoming delicious meal while sipping on a glass of wine and conversing with friends is a fantastic way to spend an hour or two. Whenever we host a dinner party, I always set out a few appetizers that are substantial enough to feel like you’re really eating something but light enough so that you don’t spoil your appetite before dinner. I used to put out the standard crudite and dip platter but after a while I started to have that “been there, done that” feeling and I wanted to offer my guests something a little more special than carrot sticks and hummus. Now I start off with spicy marinated olives, prosciutto wrapped hearts of palm, and nibbles of parmesan or pecorino romano cheese. These dishes present very elegantly and can be made a day or two ahead of time. And the best part is that they are no cook recipes so they’re perfect for hot summer nights. No fuss and lots of style, which is just how a dinner party with friends should be.

SPICY MARINATED OLIVES

6 ounce can of large pitted black olives packed in water, drained
2 garlic cloves, thinly sliced
zest and juice of one orange or lemon
2 tablespoons extra virgin olive oil
1 teaspoon red pepper flakes
1/2 teaspoon dried thyme
1/2 teaspoon cracked black pepper
2 bay leaves, crumbled

Combine all ingredients in a bowl. Cover and refrigerate for at least 4 hours and up to 48 hours. Allow to come to room temperature before serving. Serves 4.

PROSCIUTTO WRAPPED HEARTS OF PALM

7 ounce jar of hearts of palm, drained well
1/4 pound prosciutto
1/4 cup extra virgin olive oil
2 tablespoons red wine vinegar
1 teaspoon dried thyme
1/2 teaspoon cracked black pepper

If the hearts of palm are longer than a few inches then cut them in half. Wrap each piece fairly tightly in a slice of prosciutto. Lay the pieces in a single layer in a nonmetal dish.

Whisk together the oil, vinegar and thyme. Pour over the hearts of palm.

Cover and refrigerate at least 4 hours and up to 24 hours.

Allow to come to room temperature.

Sprinkle with black pepper before serving.

Serves 4.

Strawberry Basil Lemonade

May 24, 2009

My darling daughter loves pink lemonade because her favorite color is pink. She also adores strawberries (who doesn’t?) so I combined her favorite drink with her favorite fruit to make a refreshing twist on traditional lemonade, with a touch of basil to add subtle sophistication. As is, this recipe is kid friendly but I wouldn’t object if you added a splash of rum or vodka…

STRAWBERRY BASIL LEMONADE

2 quarts of pink or yellow lemonade
10 large strawberries
1 tablespoon powdered sugar
10-12 large basil leaves
2 or 3 drops red food coloring

Pour lemonade into a serving pitcher.

Place strawberries, sugar and all but 2 or 3 basil leaves in the bowl of a food processor or blender. Process on high until liquified.

Strain strawberry mixture through a fine sieve into the lemonade. Stir well.

Add the food coloring and stir well.

Add the remaining basil leaves to the pitcher.

Chill before serving.

Makes 2 quarts.

Avocado Chop Salad

May 21, 2009

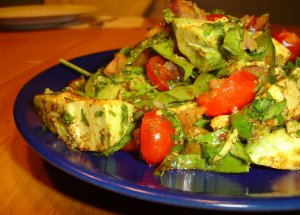
Avocados are one of nature’s most delicious gifts to human beings because they taste great and have the added benefit of being good for you and good for the planet. They’re cholesterol free, sodium free and low in saturated fat, which means we can indulge without feeling guilty. And avocado orchards inhibit erosion, stabilize soil and prevent flooding – not too shabby for such a humble looking fruit! But let’s go back to talking about how great avocados taste. Their smooth, creamy texture and cool, slightly sweet flavor make them a natural addition to salads of all varieties. I especially like the combination of avocado, cilantro and lime that you usually find in guacamole so here’s a salad that plays with those familiar flavors but adds in the unexpected surprise of mint.

AVOCADO CHOP SALAD

20 cherry tomatoes, halved if small, quartered if large
1/2 cup diced seedless cucumber
1 small red onion, finely diced
1/2 cup chopped or shredded baby spinach
2 Hass avocados, diced into bite size pieces
1/2 cup chopped cilantro
1/4 cup chopped mint
2 teaspoons Ancho chile powder
1 teaspoon crushed garlic
1/2 teaspoon kosher salt
juice of 1 or 2 limes
1 tablespoon olive oil

Place tomatoes, cucumber, onion, spinach, avocados, cilantro and mint in a large bowl.

Whisk together the remaining ingredients and pour over the salad.

Gently combine with a large spoon until the salad is coated with the dressing. Take care not to smoosh the avocado pieces.

Serve immediately.

Serves 2 well or 4 as a side salad.

Honey Buttermilk Tea Bread

May 10, 2009

Happy Mothers Day to all of the mommies out there! Today is the day when you’ll be showered with love and gratitude from your families because you are the best mom in the world. But what about all of the other days of the year? Do you ever take a little time to do something special for yourself? What about cooking something special for yourself?

Honey Buttermilk Tea Bread is the perfect little treat to bake for yourself. Mixing up the batter takes almost no time and then you hang out for a while with a cup of tea while the bread bakes in the oven and fills your kitchen with a sweet aroma. Slice the bread warm right out of the oven, spread with lemon curd or your favorite jam, pour yourself another cup of tea and then relax. You deserve it.

HONEY BUTTERMILK TEA BREAD

2 tablespoons vegetable shortening
1 cup clover honey
1 egg, beaten
1 teaspoon vanilla or almond extract
2 1/2 cups sifted flour
2 1/2 teaspoons baking powder
1/2 teaspoon baking soda
1/2 teaspoon salt
3/4 cup buttermilk

Preheat oven to 325 degrees.

Grease a 9 inch loaf pan.

Cream together the shortening and honey.

Whisk in the eggs and vanilla or almond extract until fully incorporated.

Mix together the flour, baking powder, baking soda and salt in a separate bowl.

Add the flour mixture to the honey mixture alternately with the buttermilk. Stir just until the flour is dampened. Do not overmix.

Spoon batter into the prepared loaf pan.

Bake for 70 to 75 minutes.

Allow tea bread to cool in loaf pan for 10 minutes before turning out.

Serve warm or at room temperature.

Makes 1 loaf.

Smoky Orange Grilled Chicken

May 2, 2009

Grilling season is upon us once more! When the warm spring weather finally rolls in after months of snow and dreary skies, we grill almost every night so I’m always on the lookout for new ingredients to spice up our usual grilled chicken dishes. Chicken seasoned with Spanish smoked paprika, olive oil and garlic is a family favorite but even our favorites can get a little boring if we eat them too often. So I went on a supermarket mission to find something different to add to the smoked paprika marinade that I usually make. In the international food aisle, a bottle of Goya Bitter Orange caught my eye so I brought it home and added a big splash to the smoked paprika marinade. All I can say is WOW! Bitter Orange + smoked paprika = YUM! Don’t be fooled by the bitter designation because the flavor isn’t truly bitter, but rather a really strong orange flavor without the sweetness inherent in the orange juice that you drink for breakfast. You wouldn’t drink bitter orange juice on its own but it’s awesome in marinades and I imagine you could make a mean cocktail with it.

If you’re lucky enough to get your hands on some fresh sour oranges or bitter oranges, then by all means juice those babies and use the fresh juice instead of the bottled stuff. Sour or bitter oranges aren’t stocked at my local supermarket but I wonder if they’re available at the Latino market in the next town over. Field trip!

SMOKY ORANGE GRILLED CHICKEN

4 pounds bone-in, skin-on chicken pieces
1/4 cup olive oil
1/2 cup bitter orange juice
1 tablespoon smoked paprika
4 garlic cloves, minced
1/2 teaspoon kosher salt
1/2 teaspoon freshly cracked black pepper
1 large bay leaf, crumbled

Whisk together all of the ingredients, except the chicken.

Place the chicken pieces in a large bowl or in an extra-large ziplock bag. Pour the marinade over the chicken and turn the pieces until they are coated in the marinade. If using a bowl, cover with a lid or plastic wrap. If using a ziplock bag, gently press out the extra air before closing the top.

Refrigerate the chicken for 6-8 hours. For best results, turn the chicken in the marinade after a few hours.

Let the chicken rest in the marinade at room temperature for 30 minutes before grilling.

Heat grill to medium high.

Gently shake off any excess marinade from the chicken pieces before placing on the grill. Grill for approximately 10 minutes per side for large pieces, such as the breast or thigh. Smaller pieces like the wing will cook much faster so turn them after 5 or 6 minutes. The chicken is done when the juices run clear when pricked with a fork or small knife.

Serves 4.

Green Bean Salad

April 26, 2009

I’m lucky to have kids who don’t turn up their noses at green vegetables. Actually, I’m lucky to have one kid who will eat just about anything and another who will eat almost anything as long as it’s served with a side of ketchup. Green beans are a popular vegetable at my house so we eat them often, about once a week.

I love green beans cooked almost any way but I really enjoy them in cold salads. When the weather warms up, I try to move away from the hot vegetable dishes that graced our wintertime table and take advantage of lighter salads that highlight fresh vegetables and fresh herbs. Green beans are the perfect vehicle to showcase fresh herbs so we eat a lot of green bean salad in the late spring and summer, when fresh herbs are in season. My family’s favorite green bean salad is fantastic because you can play around with the herbs in the recipe and use whatever you have on hand or whatever you particularly like. I often use Italian flat leaf parsley because I always have a big bunch in the fridge but I also love using fresh basil, dill or oregano. Instead of using a solo herb, you can also mix and match your favorites for a more complex and sophisticated herb flavor. Some of my favorite combos for this salad are basil and mint (amazing, by the way), oregano and thyme, and parsley and dill.

GREEN BEAN SALAD

For the salad:
12 ounces green beans, steamed and shocked in ice water to preserve color (drain thoroughly)
1 plum tomato, thinly sliced
1/2 cup red onion, thinly sliced
1 garlic clove, minced
handful of Italian flat parsley leaves or other fresh herbs

For the dressing:
2 tablespoons extra virgin olive oil
2 teaspoons red wine vinegar
1/2 teaspoon Dijon mustard
1/4 teaspoon kosher salt

For the croutons:
3 slices white bread, cut into 1 inch cubes
1 tablespoon olive oil
1/2 teaspoon garlic powder
1/4 teaspoon kosher salt

Preheat oven to 350 degrees.

Place the steamed green beans, tomato, onion, garlic and the fresh herbs in a large bowl or platter.

Prepare the dressing by whisking together the 2 tablespoons of olive oil, vinegar, vinegar and mustard in a small bowl. Set aside until ready to assemble the salad. (You can do this step a day ahead. Keep refrigerated until ready to use.)

Toss the bread cubes with the remaining olive oil, garlic powder and salt.

Spread the bread cubes in a single layer on a baking sheet.

Bake for 5 minutes then stir the bread cubes. Bake for another 5 to 7 minutes, until the cubes are dry and golden brown. Allow to cool completely before adding to salad. (You can prepare the croutons a day or two ahead. Store in an airtight container until ready to use.)

To assemble the salad, gently toss the vegetables with the dressing. Mix in the croutons. Serve immediately.

Serves 2 as a light meal, 4 as a side dish.

Garlic Burgers

April 25, 2009

WOO-HOO!!! It’s 80 degrees in Connecticut! Fire up the grill!

Yeah, it’s only April but today’s sunshine and balmy breezes totally feel like summer. And what could be more quintessentially summer than grilling some burgers and dining al fresco?

These hamburgers aren’t your plain old garden variety hamburger because they are loaded with bits of garlic in every bite. The inspiration for my garlic burgers comes from the Hudson Valley Garlic Festival, which is held every year in Saugerties, New York. (This year’s Garlic Festival takes place on September 26 and 27- you should go!) On my first trip to the Festival, I tasted the most insanely delicious hamburger EVER. It was steaming hot off the grill, with huge chunks of garlic poking through the patty and slathered with dijon mustard. In other words, it was heaven on a bun. Ever since that fateful day, every hamburger created in my house is studded with garlic. I’ve never been able to quite duplicate the absolute awesomeness of my very first garlic burger, but this recipe comes pretty close.

I like to top my garlic burgers with caramelized onions and dijon mustard. Of course, you can use whatever toppings you like so get creative- maybe some bleu cheese or hot cherry pepper slices or olive tapenade. Or go traditional with tomatoes, lettuce, ketchup and mustard. It’s up to you. But make sure you don’t forget the pickles and potato chips.

GARLIC BURGERS

3 pounds lean ground beef
15 big garlic cloves, chopped (this is usually a whole head of garlic)
1/4 cup flat leaf parsley, finely chopped
1 tablespoon Worcestershire sauce
freshly ground black pepper to taste
10 kaiser rolls
2 tablespoons olive oil
Optional: 2 garlic cloves, halved

Mix the first five ingredients until the garlic is evenly distributed throughout the ground beef.

Use a half-cup measuring cup to make equal sized patties. Gently pack some of the ground beef into the cup, but not too tightly. Gently turn over into the palm of your hand and gently shape into a patty. Repeat with the remaining beef.

Heat the grill to medium high. Grill each hamburger for 7-10 minutes per side, turning once. If you like a rarer burger, shoot for the 7 minute mark. If you like it well done them aim for 10 minutes but take a look after 9 minutes because the burgers might be done. Be mindful that each grill varies a bit so pay attention while you’re grilling so that you don’t accidentally overcook the burgers.

While the burgers are grilling, split each kaiser roll. Brush the cut sides lightly with the olive oil.

When the burgers are done, remove to a platter and set aside to rest for a few minutes while you prepare the rolls.

Place the rolls, cut side down, on the grill for a minute or two until they toast a bit on the edges. Keep an eye on them so that they don’t become too dry, like toast. They should be browned and crusty on the edges but still soft inside.

If you’re REALLY in the mood for garlic, gently rub a cut side of a garlic clove against the toasted side of a roll. Otherwise, you cans skip this step. I love the fresh pungency of the raw garlic but you can leave it out without compromising flavor.

Makes 10 burgers.

Pollo al Pimientos

April 18, 2009

This is definitely one of the best chicken dishes I have ever tasted. Truly, I would not lie to you- it’s that amazing. Unfortunately, I can’t claim the credit for creating Pollo al Pimientos because it’s on the dinner menu at Barcelona, my favorite Spanish restaurant in Connecticut, but I will accept your congratulations for figuring out the recipe so that all of us can cook it at home. Breaking down the recipe and getting it just right took a couple of tries but the effort paid off immensely once I mastered the silky, luxurious white wine and butter sauce that bathes the chicken. The sauce is the key to the dish because without it you just have a boring piece of chicken sitting on your plate. The quality of the sauce really depends on the quality of wine so please use a good wine and not that bottled cooking wine from the supermarket. I used a mid-priced bottle of Albarino, Spain’s premier white wine from the Galicia region of Northwest Spain (which is the ancestral home of my husband’s maternal relatives so it was a fitting choice for my family), but you can use whatever white wine you especially enjoy as long as it isn’t too sweet. Albarino has a bright, tart flavor with notes of almond and citrus so look for a wine with those qualities if you want to try something different.

The restaurant serves the chicken very simply with only pan roasted potato slices. In my recipe, I’ve also added in some spinach sauteed with garlic and cumin because the mother in me believes that every dinner should include a vegetable. I used spinach because that’s what I had on hand but you can use whatever green vegetable you prefer, like steamed green beans or asparagus.

Be forewarned: this dish is not for people with sensitive palates because it’s not merely spicy, it’s hella spicy due to the hot cherry peppers. You will feel the burn, but in a good way, I promise. This recipe serves two because I cooked it just for me and my husband when I was experimenting with the recipe but you can easily double or triple the ingredients. But use a little restraint with the hot cherry peppers if you’re tripling the recipe because they can be insanely spicy in large quantities. If you’re making a triple recipe, use only a double shot of the peppers.

POLLA AL PIMIENTOS

For the chicken and potatoes:

3 tablespoons olive oil
2 large boneless, skin-on chicken breasts
1/2 teaspoon kosher salt
1/2 teaspoon freshly cracked black pepper
4 garlic cloves, sliced thinly
2 cups low sodium chicken broth
1/2 cup white wine
4-6 small hot cherry peppers, stemmed and seeded but left whole
juice of 1 lemon
2 tablespoons cold butter
2 russet potatoes, peeled and sliced lengthwise in 1/4″ thick slices
2 tablespoons finely chopped parsley

For the spinach:

1/2 pound spinach, tough stems removed
1 tablespoon olive oil
4 garlic cloves, chopped
1/2 cup low sodium chicken broth
1 teaspoon cumin
salt and freshly ground pepper to taste

Season the chicken on all sides with the salt and pepper.

Heat the 3 tablespoons of olive oil in a large saute pan over medium heat.

Add the potato slices in one layer. Saute for 3 minutes on each side, or until golden brown. Use a slotted spoon or spatula to remove the potatoes to a plate. Set aside until you’re ready to plate the chicken.

Lower the heat under the saute pan to medium-low. Add the chicken, skin side down, and saute for about 8 minutes or until beautifully browned. Turn over and brown the other side for another 8 minutes. Feel free to adjust the heat even more if pan seems too hot or not hot enough. Remove the chicken to a plate and cover to keep warm. If the chicken breasts are really thick, they might not be cooked through but that’s okay because they’re going back into the pan later.

Add the garlic, broth, wine and lemon juice to the pan. Raise the heat to medium-high and reduce the liquid by almost half, about 10 minutes.

Add the chicken back to the pan, skin side up. Add the hot cherry peppers. Cover the pan. Lower heat to medium low and simmer for another 8 minutes.

While the chicken is simmering, heat the oil for the spinach in a large saute pan over medium high heat. Add the garlic and stir until fragrant, about one minute. Add the spinach and pour over the broth. Sprinkle the cumin over the spinach and season to taste with salt and pepper. Cover and cook until the spinach is just wilted, which takes a couple of minutes. Uncover and allow the extra liquid to cook off. Turn off the heat and let rest until you’re ready to plate the chicken.

Arrange the potato slices in a fan pattern on your serving dishes. Place a small mound of spinach on the plate at the base of the fan. Place a chicken breast on top of each mound of spinach.

Swirl the cold butter into the sauce until melted and fully incorporated. Spoon the sauce and hot cherry peppers over the chicken and potatoes. Garnish with the parsley.

Serves 2.
Pork Chops with Artichokes & Capers

April 9, 2009

Spring is here!

I always know for sure that spring has finally chased away the winter when I start seeing big piles of beautiful artichokes in the produce section. I absolutely love artichokes prepared in almost any fashion but I am especially partial to baby artichokes because they are so tender and delicately flavored. After you strip away a couple layers of the tough outer leaves you’re left with the heart, which is entirely edible and has none of that fuzzy, prickly stuff you’d find at the heart of a regular artichoke. Baby artichokes aren’t really any younger than mature artichokes but they’re called babies due to their much smaller size, which is the result of growing closer to the ground. The higher up the stalk, the bigger the artichoke. Bigger artichokes taste wonderful too but I enjoy the elegance of smaller sized artichokes when I want to use whole artichokes as part of a sauce.

The artichoke and caper sauce in this recipe tastes great with different kinds of meat. I used pork chops because that’s what I had in the fridge but you can substitute chicken breasts, veal chops or even lamb chops. Just make sure that whatever pieces of meat you choose are all about the same size to ensure even cooking.

PORK CHOPS WITH ARTICHOKES & CAPERS

4 bone-in pork chops, about 1 1/2 pounds total weight
1 tablespoon olive oil
1/2 teaspoon salt
1/2 teaspoon freshly ground white pepper
2 lemons
9 baby artichokes
4 big garlic cloves, sliced thinly
8 ounce jar of capers, drained
1 cup chicken broth
1/2 cup white wine
1 tablespoon cold butter
1/3 cup chopped chives

Fill a large bowl with cold water and add the juice of one of the lemons.

Clean the artichokes by peeling away the outer layers of the leaves until you reach the more tender, greenish-yellow leaves right outside the heart. Cut off the top third of each artichoke. Trim the stem end. Slice in half. Place the artichoke halves in the bowl of water until ready to use.

Season the chops with salt and pepper.

Heat the oil in a large saute pan over medium heat. Brown chops well on both sides and cook through, about 5-7 minutes per side. Turn them a couple of times to avoid burning. Remove to a platter and cover tightly with foil to keep warm.

Deglaze the pan with the white wine.

Add the artichokes, garlic, broth and juice of the other lemon.

Turn up the heat a little bit. Cover and steam until the artichokes are very tender, about 10 minutes.

Lower heat back to medium.

Add the capers and heat through until warmed.

Swirl in the cold butter and chives.

Spoon the sauce over the chops and serve immediately.

Serves 4.